
| Prev page | Table of contents | Next page |
| Home | ||
The main thing to remember when installing pushrods in an R/C model is to avoid any binding, rubbing, or sticking! The hinges and pushrod linkages must be as free and smooth as possible so that the servo can move the control surface easily and accurately. The pushrods themselves must be stiff enough to keep from flexing under the air loads and "g" loads the airplane will encounter in flight. There are many different types of pushrods available on the market. 'Each has their own advantages and disadvantages, and the choice of which type to use is really a matter of personal preference. Once you are familiar with them all, you may develop a preference of one type over another in different applications. We will try to describe the most common types of R/C pushrods in just a moment, but the next two paragraphs give some general information that applies to all pushrods.
The control surface end of most pushrods is generally threaded and incorporates an adjustable metal or nylon "R/C link" (sometimes called a "clevis") which allows you to make the pushrod slightly longer or shorter in order to adjust the exact neutral position of the control surface. In the case of the throttle pushrod, it enables you to adjust the travel limits of the throttle.
The servo end of the pushrods are fastened to the servo output arms by a "servo connector". There are a wide variety of servo connector styles to choose from, and once again the choice is basically a matter of personal preference.
BALSA PUSHRODS: Balsa pushrods are popular for elevator and rudder installations because they are fairly stiff, light weight, and relatively inexpensive. Many kits include balsa pushrods because they are economical and easy to assemble. The balsa stick should be 1/4" or 5/16" square, as hard as you can find. Keep the balsa portion of the pushrod as long as possible and the wire ends as short as possible for maximum stiffness.
TIPS ON INSTALLING A
BALSA ELEVATOR/RUDDER PUSHROD
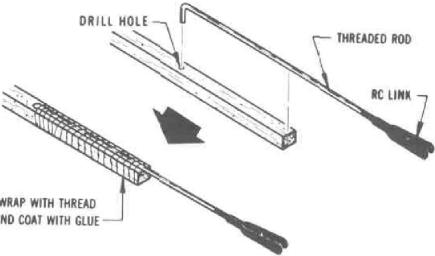
Make the control surface end of the pushrod first. Carefully try to determine the spot on the side of the fuselage where the pushrod will exit and line up with the control horn and servo. Cut a 1/8" x 3/4" slot at this spot (the slot may need to be enlarged later, but it is best to start small and make it only as big as necessary). Determine the proper shape for the thread-fid rod to allow it to exit the slot and line up with the control horn. Any bends in the wire should be kept to a minimum to avoid flexing under load. Make a small 90° bend in the unthreaded end of the wire to push into the balsa stick. Next tightly wrap the wire to the balsa stick with heavy thread. Coat the binding with glue to keep it from ever unraveling. When dry, feed the pushrod through the fuselage, sticking the threaded rod through the slot. Screw an R/C link onto the threaded rod and hook it to the control horn.
Hold the control surface in its neutral position and cut off the servo end of the balsa pushrod stick about 2" short of reaching the servo's output arm. Remove the pushrod from the fuselage and attach a straight 6" long piece of plain 1/16" dia. music wire (don't substitute softer wire!), using the same method as the other end. Feed the pushrod back into the fuselage and hook the tail end back up to the control horn. Make sure the R/C link is centered on the threads at the control surface end so that you will have equal adjustment range either way. With the servo centered in neutral position, hold the control surface in its neutral position and cut the 1/16" wire to the proper length to accommodate your choice of servo connector.
ARROWSHAFT PUSHRODS: On larger airplanes (.60-size engine and up), some modelers prefer to use fiberglass or carbon fiber "arrowshaft" pushrods for their elevator and rudder. Arrowshaft pushrods are stiffer than balsa pushrods, but they cost quite a bit more. The installation of an arrowshaft pushrod in the model is basically the same as we outlined above for a balsa pushrod. Instead of binding the wires to the pushrod with thread, they are fitted inside the arrowshaft and secured with a glued-in wooden or plastic plug. NOTE: For airplanes over 12 pounds flying weight, we recommend that you use heavy-duty 4-40-size threaded rods and R/C links instead of the standard 2-56 size.

NYLON TUBING PUSHRODS: Nylon tubing pushrods are also popular for the elevator and rudder, particularly in small-to-medium size models where space is limited, because they are easy to install, take up a minimum of room, and do not have to be routed in a perfectly straight line from the servo arm to the control horn. A nylon tubing pushrod can be gently curved around obstacles. Keep the bends as gentle and flowing as possible, because too sharp a bend can cause binding. A nylon tubing pushrod consists of a small nylon tube that slides inside of a slightly larger nylon tube. The outer tube is glued securely to the model structure, at intervals of six inches or so, to keep the pushrod from flexing under load. It's best to assemble the pushrods and fit them to the model before the model is covered or painted. The ends of the pushrod are made up using standard threaded rods and nylon R/C links.
SEE NEXT PAGE FOR DIAGRAM
|
| Prev page | Table of contents | Next page |
| Home | ||


